
DIMA-nager Security Guide — Two-Factor Authentication & Inactivity Sign-Out
1. Overview
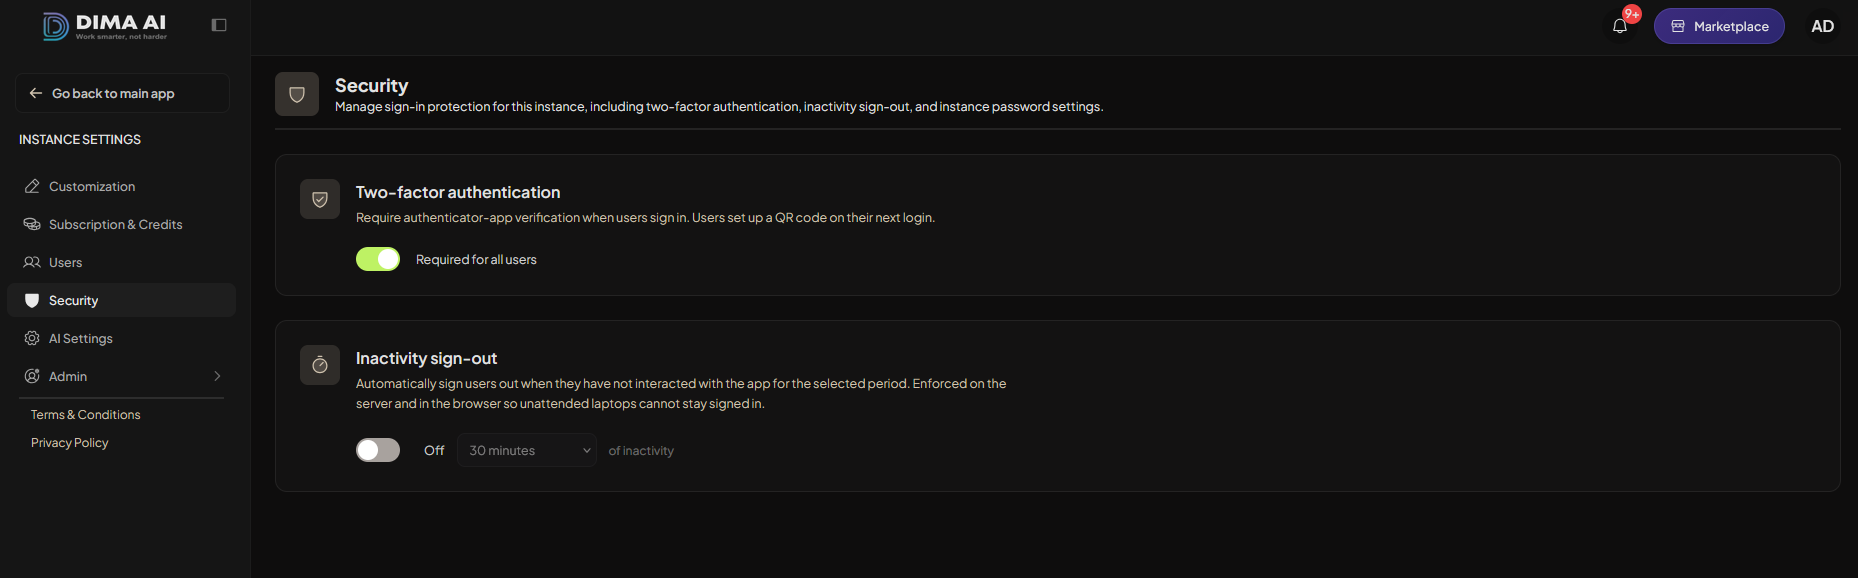
The Security page (/settings/security) lets instance administrators manage sign-in protection for a DIMA-nager deployment. In multi-user mode, the page exposes two organization-wide policies:
| Feature | Purpose |
| Two-factor authentication | Require every user to verify sign-in with an authenticator app (TOTP). |
| Inactivity sign-out | Automatically sign users out after a period without interaction. |
When multi-user mode is not enabled, the page instead shows instance password protection (a single shared password for the whole deployment). 2FA and inactivity sign-out are not available in single-user mode.
Who can configure policies:
- Administrators only (
adminrole).
Who is affected:
- All users in multi-user mode once a policy is enabled.
2. Accessing the Security page (admins)
Navigation
- Sign in as an admin.
- Open the user menu (avatar, top-right).
- Click Administration.
- In the settings sidebar, click Security (shield icon).
Direct URL:https://<your-brand>.dima-ai.com/settings/security
What you will see
The page has three possible sections depending on instance mode:
- Two-factor authentication — toggle + status (multi-user only)
- Inactivity sign-out — toggle + duration dropdown (multi-user only)
- Instance password — shared password toggle (single-user only; hidden when multi-user is on)
3. Two-factor authentication policy (admins)
What it does
When Required for all users is on:
- Every user must enroll in 2FA before they can use the application.
- On sign-in, users who have not yet enrolled are sent to the setup wizard (
/two-factor/setup). - Users who already enrolled must enter a 6-digit code from their authenticator app after their password.
- The server blocks most API access until enrollment is complete (auth routes remain available so setup can finish).
- Users cannot turn off 2FA while this policy is active.
When the policy is Off, 2FA is not mandatory. Users who enrolled previously still use 2FA at login until an admin resets their enrollment.
Enable 2FA (step-by-step)
- Go to Administration → Security.
- Under Two-factor authentication, turn the toggle on.
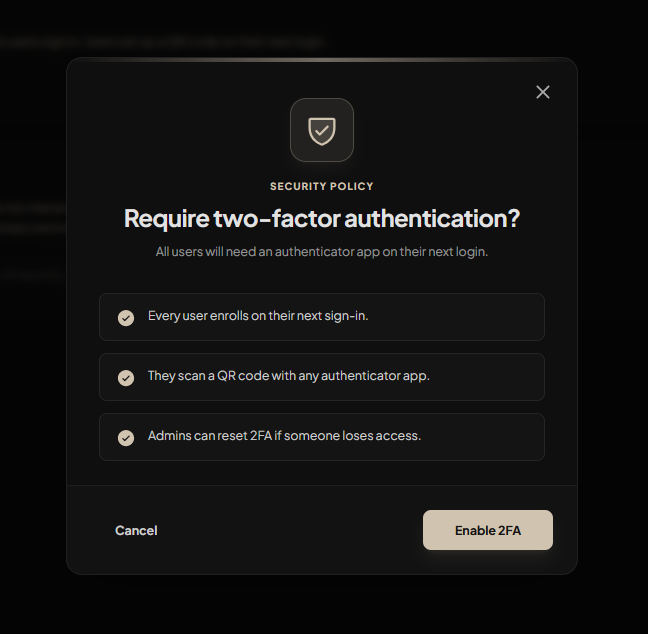
- A confirmation dialog appears summarizing the impact:
- Every user enrolls on their next sign-in. - They scan a QR code with any authenticator app. - Admins can reset 2FA if someone loses access.
- Click Enable 2FA.
- A success toast confirms: "Two-factor authentication is now required for all users."
What happens next for users
- Users already signed in without 2FA are redirected to setup on their next navigation or refresh.
- Users signing in fresh complete password entry, then either 2FA verification (if already enrolled) or the setup wizard (if not).
Disable 2FA requirement
- Go to Administration → Security.
- Under Two-factor authentication, turn the toggle off.
- The change applies immediately — no confirmation dialog.
- A success toast confirms: "Two-factor requirement turned off."
Note:
Turning off the policy does not remove existing authenticator enrollments. Users who already set up 2FA will still be prompted for a code at login until an admin resets their 2FA (see Section 12 ).
Recommended rollout checklist
- Announce the change to your team with a deadline.
- Enable the policy during a low-traffic window.
- Ensure at least one admin can access Users to reset 2FA for locked-out accounts.
- Remind users to save backup codes during setup.
- Monitor event logs for
twofactorpolicyenabledandtwofactorresetentries.
4. Inactivity sign-out policy (admins)
What it does
Inactivity sign-out ends a user's session when they have not interacted with the application for the configured period. Enforcement runs in both the browser and on the server so unattended devices cannot stay signed in indefinitely.
This is useful for:
Shared workstationsCompliance requirements for session lifetimeReducing risk from forgotten open browser tabs
Enable inactivity sign-out (step-by-step)
Go to Administration → Security.Under Inactivity sign-out, turn the toggle on.Select a duration from the Sign out after dropdown (default: 30 minutes).A success toast confirms, e.g. "Inactivity sign-out enabled (30 min)."
Changing the duration while the policy is enabled saves immediately when you pick a new value from the dropdown.
Disable inactivity sign-out
Go to Administration → Security.Turn the Inactivity sign-out toggle off.A success toast confirms: "Inactivity sign-out disabled."
Interaction with 2FA enrollment
If 2FA is required but a user has not finished enrollment, inactivity sign-out is not enforced for that user. This gives them time to complete the setup wizard without being signed out mid-flow.
Once 2FA enrollment is complete, inactivity sign-out applies normally.
What counts as "activity"
Counts as activity (resets the idle timer):Mouse clicks (mousedown)Keyboard input (keydown)Touch input (touchstart)Does not count as activity:Scrolling (including automatic chat scroll)Mouse movement without clickingBackground API polling (read-only checks)
When activity is detected, the browser resets its local timer and periodically notifies the server via a heartbeat so both layers stay in sync.
5. Instance password protection (single-user mode)
This section appears only when multi-user mode is off. It is unrelated to per-user 2FA.
What it does
Protects the entire instance with a single shared password (legacy single-user deployments).
Configure instance password
Go to Administration → Security.Under the password section, toggle Require password on or off.If enabled, enter a password (minimum 8 characters).Click Save.The page refreshes after a few seconds; you may need to sign in again.Allowed password characters: letters, numbers, and - ! @ $ % ^ & ( ) ;
6. First-time 2FA setup (users)
Users are guided through setup when:
An admin enables the 2FA requirement and they have not enrolled yet, orThey sign in and the application detects requiresTwoFactorSetup.Setup URL: /two-factor/setup
Before you start
Install an authenticator app on your phone or computer. Supported apps include any TOTP-compatible application, for example:
Google AuthenticatorMicrosoft AuthenticatorAuthy1PasswordBitwarden
Step 1 — Confirm your password
You see Set up two-factor authentication.Enter your account password (the same one you use to sign in).Click Continue.
This confirms your identity before a secret key is generated.
Step 2 — Scan the QR code
Open your authenticator app and choose Add account or Scan QR code.Scan the QR code shown on screen.Your app displays a 6-digit code that refreshes every ~30 seconds.Enter the current 6-digit code in the verification field.Click Verify and finish.Cannot scan the QR code?
Use your app's manual entry or enter setup key option. The QR encodes a standard TOTP provisioning URI for DIMA-AI (the issuer name shown in your authenticator).
Step 3 — Save backup codes
After verification succeeds, a Backup codes screen appears.
Review the list of one-time backup codes.Click Copy all or write the codes down manually.Store them somewhere safe (password manager, secure note, printed copy in a locked location).Check I have saved these backup codes.Click Continue.
You are then signed in and redirected to the application.
> Important: Backup codes are shown once during initial setup. If you lose them and lose access to your authenticator, contact an administrator to reset your 2FA.
7. Signing in with 2FA (users)
Normal sign-in flow
Go to the login page.Enter your username or email and password.Click Sign in.You are redirected to Enter verification code (/login/two-factor).Open your authenticator app and enter the current 6-digit code.Optionally leave Trust this device for 30 days checked (see Section 10).Click Verify.
On success, you are signed in and redirected to your home workspace or last destination.
Using a backup code at login
If you cannot access your authenticator app:
On the verification screen, click Use a backup code.Enter one of your saved backup codes.Click Verify.
Each backup code works only once. After use, discard that code from your records.
To switch back, click Use authenticator code.
Return to sign-in
Click Back to sign in if you need to re-enter your username and password.
8. Backup codes (users)
What they are
Backup codes are single-use recovery codes generated during 2FA enrollment. They let you sign in when your authenticator app is unavailable (lost phone, new device, app uninstalled).
Best practices
| Do | Don't | |----|-------| | Save codes in a password manager | Store codes only in email or chat | | Keep a printed copy in a secure place | Share codes with colleagues | | Use each code only once | Expect codes to work after they've been used | | Contact an admin if all codes are used | Attempt to guess or reuse codes |
If you lose your backup codes
You cannot view backup codes again from the application UI after setup. If you still have your authenticator app, continue signing in with TOTP codes. If you have lost both your authenticator and backup codes, ask an administrator to Reset 2FA on your account (see Section 12).
9. Trust this device (users)
On the 2FA verification screen, Trust this device for 30 days is enabled by default.
When checked:
You will not be asked for a 2FA code on this browser/device for approximately 30 days.You still need your username and password to sign in.
When unchecked:
Every sign-in requires a fresh 2FA code.Security tip: Do not trust shared or public computers. Uncheck the option on kiosks, lab machines, and borrowed laptops. Note: Trust-device applies to TOTP verification. The backup-code flow does not offer the trust-device checkbox.
10. Disabling 2FA (users)
When the organization requires 2FA
If an administrator has enabled Required for all users, you cannot disable 2FA. The server rejects disable requests with:
> Two-factor authentication is required by your organization and cannot be disabled.
When 2FA is optional (policy off)
The application does not currently expose a self-service Disable 2FA button in account settings. Users who enrolled while the policy was on will continue to use 2FA at login until an administrator resets their enrollment.
If you need 2FA removed from your account, contact your instance administrator.
11. Admin: resetting 2FA for a user
Use this when a user loses their authenticator, exhausts backup codes, or gets a new phone and cannot transfer their TOTP secret.
Who can reset
Admins only (not managers)The Reset 2FA action appears only for users who currently have 2FA enabled
Step-by-step
Sign in as an admin.Go to Administration → Users (/settings/users).Find the user in the table.Click Reset 2FA in their row.Confirm the prompt:
> Reset two-factor authentication for [user]? They will need to set it up again on next login.
The page reloads on success.
What the reset does
| Action | Effect | |--------|--------| | Deletes the user's 2FA secret and backup codes | Previous authenticator entries stop working | | Sets twoFactorEnabled to false | User treated as not enrolled | | Deletes all active sessions for that user | User is signed out everywhere | | Writes an audit event (twofactorreset) | Logged with target user and admin who performed reset |
After the reset
If 2FA is still required organization-wide, the user must complete the setup wizard on next sign-in.If 2FA is optional, the user can sign in with password only until they choose to enroll again.